Tampilkan postingan dengan label solidworks. Tampilkan semua postingan

Selasa, 31 Mei 2016

SolidWorks Orienting the View

,
In all CAD software, there are three most fundamental view orientation could be done: pan, rotate, and zoom. In each software, how to navigate the view can varies. Here is how you can navigate your view in SolidWorks.

Pan
To pan the view, you need to hold down the ctrl key and the mouse scroll button while moving your mouse to the direction you want to move.

Rotate
Rotate view can be achieved simply by holding the mouse scroll button, and move your mouse to the direction you want to rotate. Rotation could be achieved by using the arrow keys as well.

Zoom
To zoom view, you could scroll up your mouse to zoom out, and scroll down to zoom in the view. There are another method that you could use using the button in view setting region.

SolidWorks - View Option

   Zoom to fit - clicking on this icon would zoom the model to fit the window.

   Zoom to area - to zoom in to an area that you select. Clicking this icon would prompt you to select the area which you want to zoom in.

   Previous view - to display the previous view state.

Other than using this options, SolidWorks also have very useful tool to orientate the view accurately. The orientation menu could be trigerred by pressing space bar. 

SolidWorks - Orientation menu

On the orientation menu, there are view options you could choose by double-clicking on the view name. For example if you select front, SolidWorks would automatically orientate the view such that user would view the front of the model. To use the *Nomal To view, a surface should be selected in advance.

You could also save certain view that you want by clicking on the New View icon.
SolidWorks - New View Option

Read more

Sabtu, 21 Mei 2016

SolidWorks Tutorial Pen Cover

,
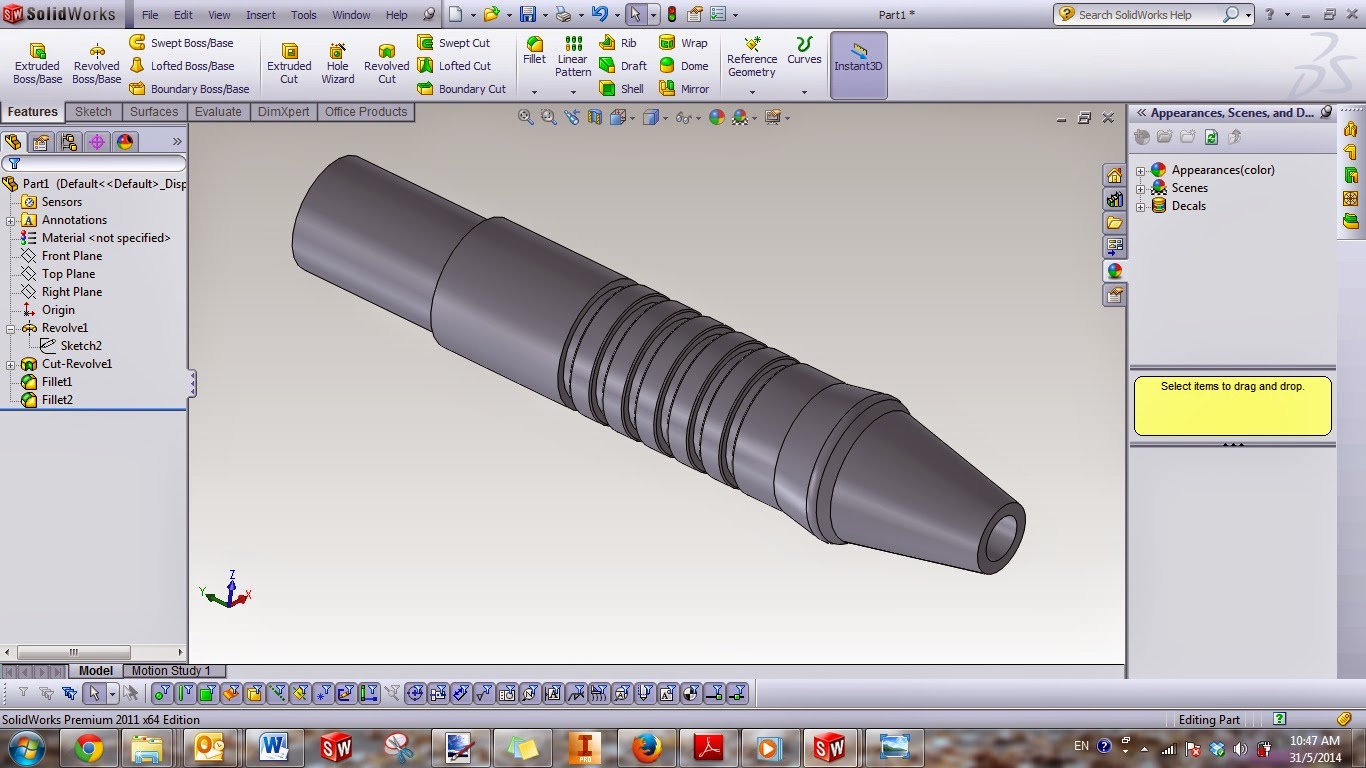
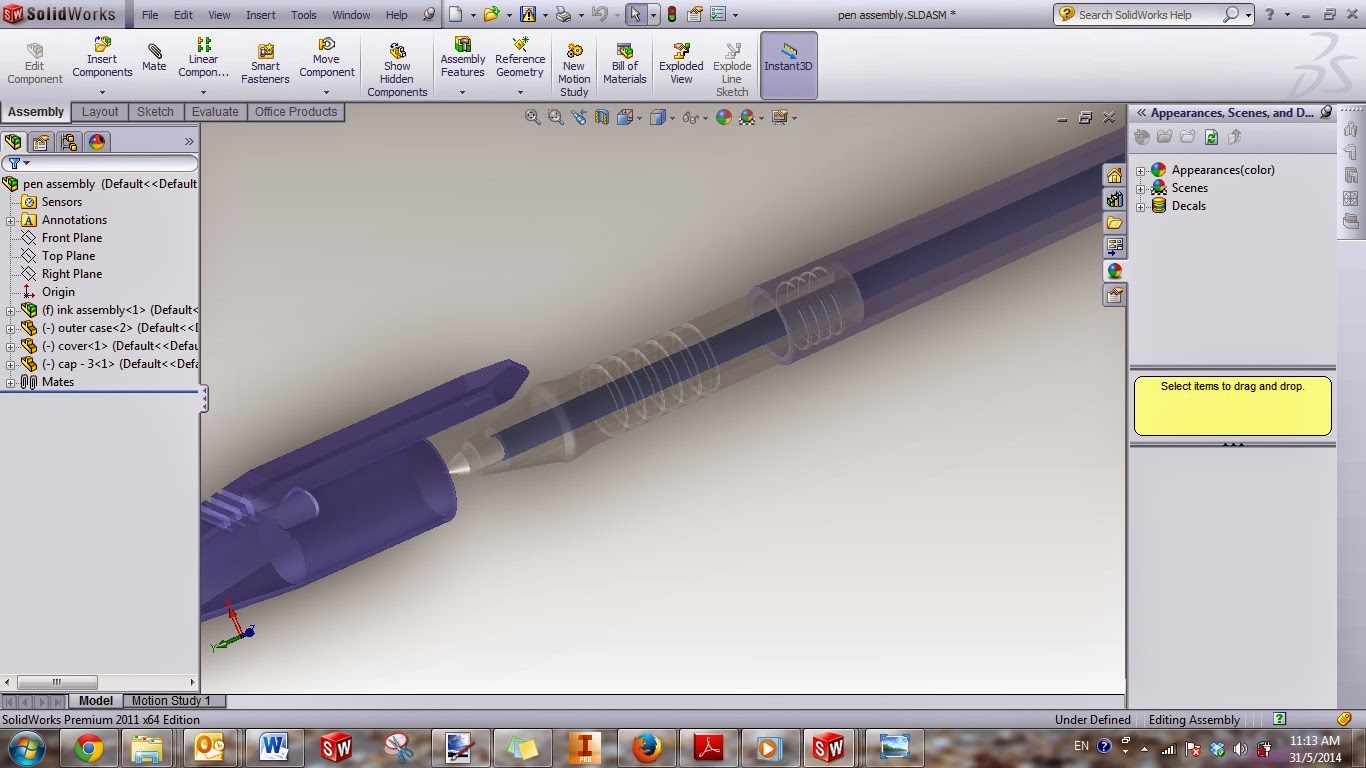
This time round, the tutorial I made would be to model one part of a pen, which is its cover. The complete set of assembly however, can be downloaded from here.

I chose to make the tutorial only for one part as you can learn how to use several features in this tutorial.


Skill learned: 

Revolved Boss/Base, Revolved Cut, Fillet, Sketch Relationship


Final Product:


Tutorial:

  1. Open up SolidWorks > New > Parts.
  2. On the Model Tree, right click on the Front Panel, and select Sketch.
  3. Select the arrow besides line, and select Centerline. Draw a vertical line passing through the origin. 
  4. Select line, and draw a shape of object that looks like shown below. 
  5. Select Smart Dimension, and give the dimensions as shown below. Note that all dimensions against the Centerline are all for diameter, instead of radius. Read here for a note of how to give diameter instead of radius on revolve. 

  6. Click Insert > Boss/Base > Revolve. Or alternatively, click on the Features Ribbon, and select Revolved Boss/Base. You should see a preview as shown below. Click the green thick button (OK) to confirm.
  7. Right click on Front Plane, and select Sketch.
  8. Repeat step 3, draw a vertical Centerline passing through the origin. Draw 6 rectangular box as shown below.
  9. Hold down Ctrl button, and select all 6 inner edge of the rectangle. On the left dialog box, select Colinear and Equal.
  10. Give the dimension of the rectangular box as shown below. Note that the spacing of the box (1.5 mm) is the same for all. 
  11. Click Insert > Cut > Revolve. Or alternatively, click on the Features Ribbon and select Revolved Cut. A preview should appear. Select the green thick button (OK) to confirm. 
  12. On the Features Ribbon, select Fillet. On the left dialog box, adjust the radius to 1 mm, and select the edge shown below. 
  13. Add fillet on the edges of the revolved rectangle, adjust the radius to 0.1 mm and select all the edges as shown below. Note that you can select the surface (highlighted on the rightmost selection) instead of selecting the edges one by one. Read here for explanation of the selection.
  14. Congratulation! You have completed your model!
Read more

Minggu, 15 Mei 2016

SolidWorks Creating Plane

,
On the creation of new parts, by default the parts would have three default planes automatically created by SolidWorks, which are the Front Plane, Top Plane, and Right Plane. 

If required, additional planes can be created by selecting Insert > Reference Geometry > Plane. Or it can be accessed directly from the Features ribbon. 

To create plane in SolidWorks, users can specify up to three references to create the new plane. The reference can be either an existing plane, surfaces, edges, axis, or a point. A few example of commonly used reference is shown below.

1. Offset from existing plane

Only one reference is required. New plane that is created is parallel to the initially selected plane at specified distance. Commonly used for loft feature.

SolidWorks Plane Offset
Plane created at 50 mm away from the Top Plane

2. Plane at an angle from existing surface

Two references are required, one is a plane or a surface and another is an axis or an edge. The axis/edge selected would be the intersection of the two planes.

SolidWorks Plane Offset Angle
Plane at 30 degree angle from the selected surface

3. Plane that pass through three points

Three references points/vertex are required. The plane created will pass through all the three points.

SolidWorks Plane Three Points
Plane passing through all three selected vertex

Read more

SolidWorks Draft

,
The Draft function is used to create angle at certain face.This function is widely used on injection moulding parts. Parts fabricated by injection moulding parts would typically require certain draft angle to facilitate the removal of the parts from the mould.

Accessing the Function

The easiest way to access the function is through the Features ribbon.

Alternatively, it could be accessed through Insert > Features > Draft.

SolidWorks draft feature
Accessing Draft feature


Draft Options


The Draft function is pretty straight forward as there is not many options to this feature. To create draft angle, first select the Normal Face (highlighted in pink on picture below). The Normal face is the surface perpendicular to the draft face. Next select the Surfaces to Draft (highlighted in blue on picture below).

SolidWorks draft feature
Setting up Draft feature
Results will be shown as below.
SolidWorks draft feature
After adding Draft angle
Note that during setting up the draft feature, there is small arrow pointing upward at the Normal face. This arrow indicates the pulling direction, where the top face would become the smaller cross section area, and the lower face would become the bigger cross section area. Should this arrow is pointing downwards, the end result would looks like an inverted pyramid.
Read more

Senin, 09 Mei 2016

SolidWorks Tutorial A Beginner Guide to SolidWorks

,


Dear reader,

We are proud to announce that we are launching our first premium SolidWorks tutorial. This tutorial is based on our own series of Lego Tutorial, but with greater in depth explanation. Instead of modelling those little piece of Lego, you will be modelling a more complex shape as you see on the left.

This tutorial consists of 5 chapters, where in every chapters different SolidWorks features is being introduced. A step by step explanation, complete with the screenshot, will guide you how to use each functions. Extrude, Revolve, Sweep, Loft, Mirror, are just a few of the functions that you will learn.

Priced at just US$15, you will get this 69-pages eBook in pdf format. This tutorial is a perfect investment to improve your SolidWorks skill.

So, what are you waiting for? Click on the "Buy Now" button to make the purchase. Or you could take a look at some of the preview below.
                    

A Beginner Guide to SolidWorks
A Beginner Guide to SolidWorks - Preview


Read more

Senin, 02 Mei 2016

SolidWorks Extrude

,
There are two types of extrude in SolidWorks, Boss-extrude and Cut-Extrude. The main difference between these two is that Boss-extrude is used to add material, and Cut-Extrude is to remove material (read more about add and remove material here).

Accessing the Function

The easiest way to access these two functions is through the icon on the ribbon.
Accessing extrude function through ribbon

Alternatively, these functions could be accessed by clicking Insert > Boss/Base > Extrude for Boss-Extrude or Insert > Cut > Extrude for Cut-Extrude.
Accessing Boss extrude through menu
Accessing Cut-extrude through menu


Extrusion Options

Opening up the menu, there are few features that you can play with. 
Starting Condition
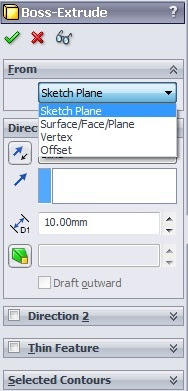
The starting condition defines where the extrusion would start. By default, it would be from the sketching plane. However, you could select other options such as from specified surface, or by defining an offset distance from the sketch plane.
Starting Condition Options

End Condition
The end condition options allow you to determine how you are going to terminate the extrusion feature. The default is on blind, where you specify the depth of the extrusion. You could use a surface to specify the depth of the extrusion in the event where the desired depth is not known.
End Condition Options

Draft Angle
The draft-angle option allow you to create a draft angle along the extrusion instead of having it perpendicular to the sketching plane. For example, applying draft angle on a circular sketch would result in a conical shape as shown below.

Draft Angle Function
Draft Angle Option

Thin-Feature
The thin-feature function allow you to create a hollow solid with certain wall thickness.
Thin-Feature Function
Thin-feature option 

You can have cap-ends function as well to have the center section to be end-capped. The thickness of the cap is user defined.

Effect of having cap-ends option
Effect of having end-caps option

Selecting Contours
In the event where there are more than one closed-loop region in the sketch, you could select which region you want to extrude using the selected-contours option. For illustration, there are four closed loop region shown in figure below, and two are selected to be extruded.
Selected Contours Function
Selected Contours option

This operation would result a solid which looks like this:
Resulted solid from select contours option
Resulted Solid
Read more

SolidWorks Assembly

,
An assembly is a combination of parts or another assemblies together. You can read the basic of assembly here.

Insert Components

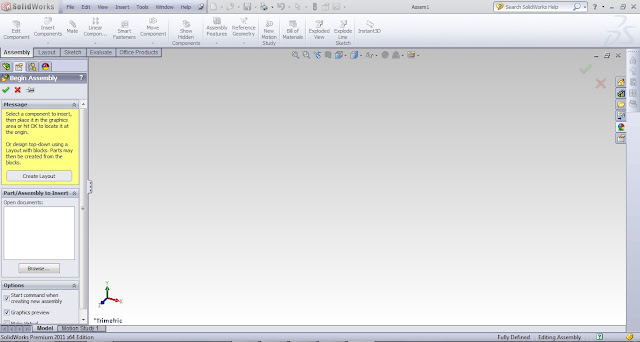
As the name said, the "Insert Components" is used to place parts or other assemblies in the assembly. When you first start your assembly, SolidWorks would automatically execute this function to prompt you to insert a component. To place your desired component, simply click on the Browse button to locate the file you wish to insert inside.

You can see how the scree would look like when you start an assembly. Note that now you have "Assembly" ribbon on top. To access this function again in future, simply click on the "Insert Components" function on the Assembly ribbon or from the drop down menu, click Insert => Component => Existing Part/Assembly.

SolidWorks Assembly Startup

Mate

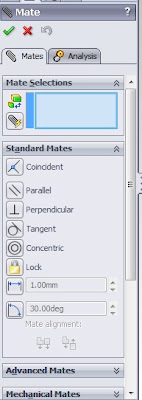
Mate is used to define the location and how each parts relate to each other. Mate can be accessed easily from the Assembly ribbon or from the drop down menu, click Insert => Mate.

SolidWorks Mate Function


In SolidWorks, the mate is divided into three categories, Standard Mate, Advanced Mate, and Mechanical Mate. For most application , Standard Mate would be sufficient to fully defined an assembly. Advanced Mate and Mechanical Mate is used more for doing simulation.

Moving Components

To move components (parts or assembly) in the assembly, you can simply left click on the component and drag it to where you want to move. To rotate the component, change it to right click and drag it along. 

For more precise movement, you can use the "Move Component" function that can be accessed from the Assembly ribbon or from drop down menu, click Tools => Component => Move for moving component; or Tools => Component => Rotate, for more precise rotation.

When you have mate between components, the relationship between the two components defined by the mate would still be maintained when you move the components. This capabilities is not available in all CAD system that makes SolidWorks one of the best software for quick design as it is very good at simulating how each components relate when it is moving relative to each other.
Read more

Minggu, 01 Mei 2016

SolidWorks Customizing Your Own Keyboard Shortcut

,
One good thing about SolidWorks is that it is very customizable. Users are able to assign or customize their own keyboard shortcut. With that, users can assign certain hot keys on their keyboard to their mostly used features. By default, SolidWorks have assigned certain hotkeys, for example "E" for extrude, "Enter" for last used commands, "Ctrl + N" for New File, etc.

Customizing your own keyboard shortcut can be done following these steps:
1. Launch SolidWorks and click New > Part. Search for the Options button on top, click the arrow besides the icon, and select Customize.
Note: The Customize would not appear immediately when you launch SolidWorks. You need to create part/assembly/drawing in order to access this function.
SolidWorks Customize
Accessing Customize Function
2. On the Customize window, go to Keyboard tab. To change any hot keys, just click on the Shortcut(s) column, and press your own hotkeys. Note that you can input combinations of hotkeys, e.g. Ctrl + s, Alt + N, etc.
SolidWorks Keyboard Customize
Customizing Keyboard Shortcut
3. Click OK to confirm.
Read more

Senin, 25 April 2016

SolidWorks 2015

,
Few weeks back, SolidWorks announce its latest version, the SolidWorks 2015. The tagline they put for the new version, "Improve your Every Day Productivity", gave me the impression that the new version could do 3D modelling easier and faster compared to their previous version.


I personally have not tried this new version yet, but looking at their promotional video, it seems that they have improved pretty much on the sketch mode. One drawback I realize for the previous version of SolidWorks is difficulties on creating 2D sketch, especially for the first feature. I would typically start of with creating dummy scale to approximate how big my sketch is. Other competitor, such as Autodesk Inventor, in their latest version of Inventor 2014 has come out with auto-scale feature which I think is a very useful function.

Another feature they mention on their promotional video is the ability to use table for pattern, which gives flexibility to customize your pattern. Even this is a great feature, I wouldnt call this a revolutionary things as other software such as Pro/E (which is called Creo now) already has this feature from quite some times ago, though it is not that easy to use!

On a personal view, I believe that the 2015 version will improve overall user experience without losing their main ace, the user friendliness. Contrary to earlier version, this version will also give option to more advance user to create their 3D model using more complex feature. If you are interested to participate to get the trial version, visit their main website and just express your interest!
Read more

Minggu, 17 April 2016

SolidWorks Zebra Stripes

,
Zebra Stripes. Some of you might have come across to this function and was wondering what the purpose of this function is. For those who havent seen it yet, you can access this function from Evaluate ribbon > Zebra Stripes.


The function of zebra stripes is to simulate the light inspection. This inspection is typically used to inspect the surface of a car. Light inspection is done by shining parallel lights unto the inspected surface. The reflection of the lights would form a contour on the surface, making any imperfections easily detected.

Aston Martin Light Inspection
The Famous Light Inspection Photography on Aston Martin Bodywork
Source: Christopher Furlong, Getty Image

When the zebra stripes function is activated, a contour profile is shown on all surfaces of your model. Even this function might not be particularly useful for solid modelling, it is a very useful function to make good surface model.

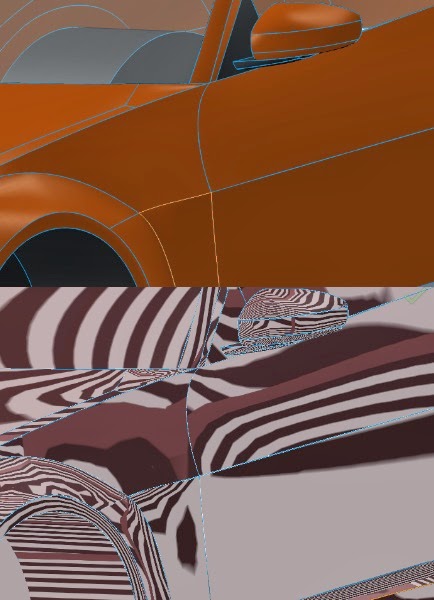
Below is an example of using the zebra stripes function to identify your surface model.

Zebra stripes - bad model
Bad Model. Notice discontinuities of the stripes between top and bottom door panel.
Spiral or circular pattern indicate that the surface has dent/bulge

Zebra stripes - good model
Good model. Notice how the stripe flow smoothly between the front and rear door panel.


Read more

Sabtu, 09 April 2016

SolidWorks Revolve

,
Same like the extrude function, the revolve function is also divided into two category, the Revolved Boss/Base and Cut-Revolve. To understand the basic operation of revolve function and the difference between boss and cut, refer here.

Accessing the Function
Similar like the extrude function, you could access the revolve function from the ribbon.
Accessing Revolve Function
Alternatively, you can go to Insert > Boss/Base > Revolve for Revolved Boss/Base. For Revolved Cut, you can click Insert > Cut > Revolve.

Revolved Options
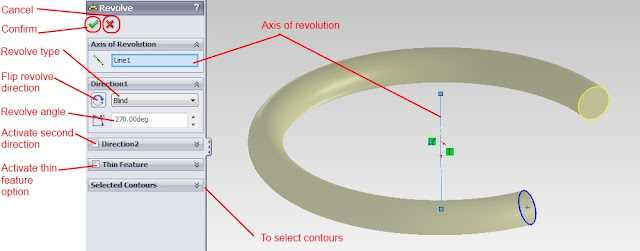
Just like Extrude function, the Revolve function also has few options. The interface of the function is shown in picture below.
Options available in Revolve Function

Revolve Type
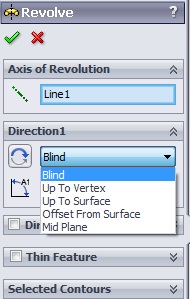
Under Revolve-Type option, there are few options could be chosen, which are Blind, Up To Vertex, Up To Surface, Offset From Surface, and Mid Plane. By default, it is set to Blind. All these options has its own advantages, depending on its application.

Thin Feature
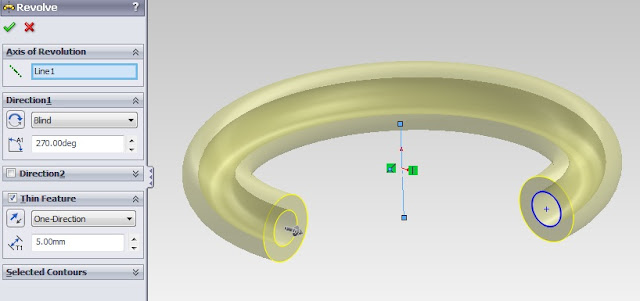
Just like Extrude, you can also have Thin Feature option on Revolve. The Thin-Feature option would create an offset to the selected profile. The offset distance is determined by the user. Thin-feature is extremely useful for doing a piping modeling.

The effect of Thin-Feature is seen in figure below, where a revolve angle of 270 degree, Thin-Feature with offset distance of 5 mm is determined by the user. The result would be a 3/4 revolution of hollow pipe.

Effect of having Thin-Feature Option


Selected Contours
When there are more than one closed loop contours, user can choose which contours they wish to revolve. This works the same way as Selected Contours in Extrude function.
Read more
 

Sharing Information Copyright © 2016 -- Powered by Blogger