Same like the extrude function, the revolve function is also divided into two category, the Revolved Boss/Base and Cut-Revolve. To understand the basic operation of revolve function and the difference between boss and cut, refer here.
Accessing the Function
Similar like the extrude function, you could access the revolve function from the ribbon.

Alternatively, you can go to Insert > Boss/Base > Revolve for Revolved Boss/Base. For Revolved Cut, you can click Insert > Cut > Revolve.
Revolved Options
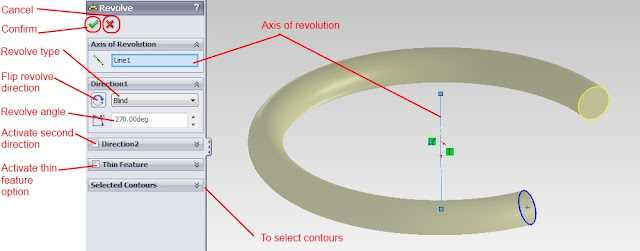
Just like Extrude function, the Revolve function also has few options. The interface of the function is shown in picture below.

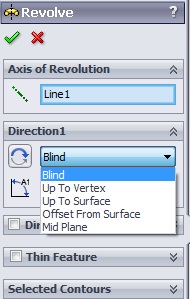
Revolve Type
Under Revolve-Type option, there are few options could be chosen, which are Blind, Up To Vertex, Up To Surface, Offset From Surface, and Mid Plane. By default, it is set to Blind. All these options has its own advantages, depending on its application.

Thin Feature
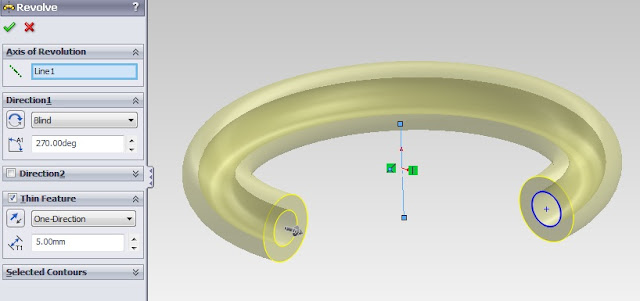
Just like Extrude, you can also have Thin Feature option on Revolve. The Thin-Feature option would create an offset to the selected profile. The offset distance is determined by the user. Thin-feature is extremely useful for doing a piping modeling.
The effect of Thin-Feature is seen in figure below, where a revolve angle of 270 degree, Thin-Feature with offset distance of 5 mm is determined by the user. The result would be a 3/4 revolution of hollow pipe.

Selected Contours
When there are more than one closed loop contours, user can choose which contours they wish to revolve. This works the same way as Selected Contours in Extrude function.